Step 1 - Make sure things are formatted correctly
WordPress itself depends on the headers at the top of your main plugin file. In many cases, if your plugin is "My Cool Plugin" this file is my-cool-plugin.php in the main directory of your folder. Make sure the top part of the file follows this format:
<?php
/*
=== [Plugin Name] ===

Plugin Name: [Plugin name]
Plugin URI: [Website where plugin information can be found - your blog, maybe]
Description: [Short description of your plugin]
Author URI: [Your website]
Author: [Your name]
Version: [This version number]
*/
The WordPress.org repository depends on your readme.txt file to create a description and download page. So make sure your readme.txt file fits the following format:
=== [Plugin Name] ===
Contributors: [Your WordPress.org username]
Donate link: [A site people can go to to give you money]
Tags: [Search terms related to your plugin]
Requires at least: [Minimum version of WordPress required]
Tested up to: [Newest version of WordPress you've tested with]
Stable tag: [This version number]

[Short, one-sentence description of your plugin]

== Description ==

[Long description of your plugin]

== Installation ==

[Steps required to install the plugin]

== Frequently Asked Questions ==

= [A question] =

[An answer]

= [Another question] =

[Another answer]

== Screenshots ==

== Changelog ==

== Upgrade Notice ==
There's a handy readme validator on WordPress.org you can use to make sure your readme has everything it needs. Just copy-paste and it will check to make sure all the sections are there and that you're ready to go.
Step 2 - Check out the SVN repository
It's a good idea to keep your development version separate from the WordPress.org plugin repository. Yes, SVN is used for version control, but WordPress uses it more for release management. If you start committing every changeset to the repository, you'll potentially run into problems. One thing a lot of developers do is develop locally using Git, then transfer your files into the Subversion repository when you're ready to do a release.
These instructions assume you're using a Windows computer. If you're on a Mac, you can use SCPlugin instead of TortoiseSVN. The steps you'll need to follow will be the same, only the contextual menus and screenshots will differ slightly because of the UI. I don't have a Mac, so I can't create screenshots to walk you through a tutorial ... but trust me, it's the same process.
Install TortoiseSVN if you don't have it already.
TortoiseSVN is an open source Subversion GUI for Windows. Trust me, using the GUI is infinitely easier than trying to do things from the command line. You'll run into fewer problems, too.
Check out your WordPress-hosted SVN repository
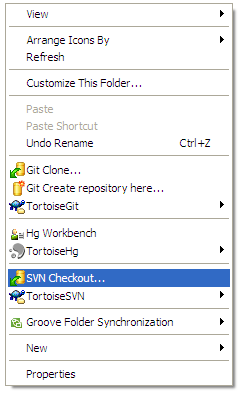
Find a place where you want to store the WordPress-hosted version of your plugin. By default, I use /My Documents/WordPress/ for all of my hosted dev work. Right-click inside the folder, and select "SVN Checkout" from the dropdown menu.

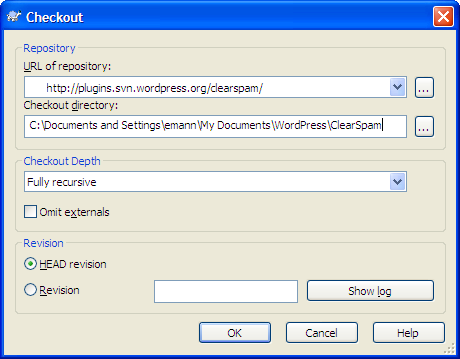
In the dialog window that pops up, enter your WordPress.org plugin repository URL (I'm using one of mine for demonstration purposes) and choose which subfolder you want to create.

Tortoise will think for a bit, then it will pull down the repository from WordPress.org. The newly created folder will have all the requisite folders already set up for you. Now you just copy-paste and commit ... one step at a time.
Copy your latest version into /tags
This is where I do things backwards from most tutorials. Everyone else will tell you to commit /trunk first, but remember that WordPress doesn't use anything in /trunk except the readme file when looking at plugins. So if you put your plugin into /trunk and lose your network connection (or something else goes wrong) before you commit a tag, you'll have issues.
In the /tags folder, create a folder named the same as the version you're releasing for your plugin. So if you're releasing version 0.1, create a /tags/0.1 folder.

Copy your entire plugin into this folder.
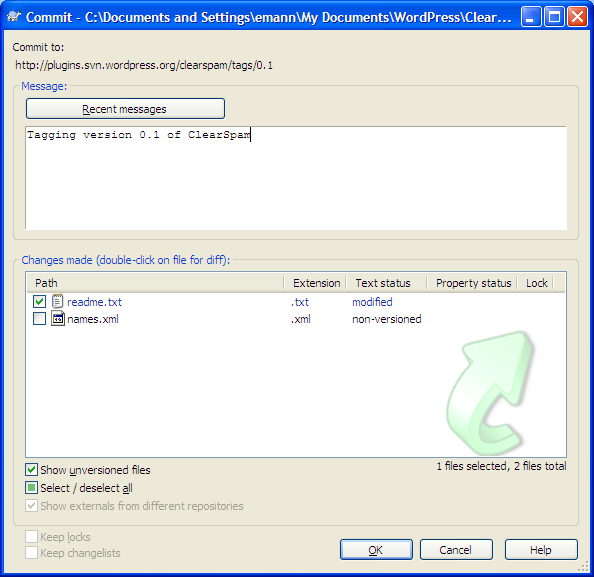
Now right-click inside the folder and select "SVN Commit" from the dropdown menu.
You'll see a window pop up that shows all of your changes (you should see all your new files marked as "non-versioned").

Check the box next to all of your plugin's files (or click "Select All" to select all of them).
In the box on the top, enter a commit message. Since you're committing a tag, you should probably use something like:
Tagging version 0.1 of [My Plugin].
Click OK.
Again, Tortoise will think for a few minutes, then it will ask you for your WordPress username and password in order to commit to the server. Provide them, wait for things to go through and say "Success," then move on to the next step.
Copy your latest version into /trunk
Now navigate to the /trunk folder of the repository and once again copy-paste your plugin to that folder. Go through the same steps above to select your files and prepare the commit. But for a message, use something that explains what the new release does:
Version 0.1 of [My Plugin] - adds support for OpenID.
Once everything goes through, you just have to wait a bit for WordPress.org's servers to catch up. They can be slower some days than others, but within an hour or so you should see your new release in the repository.
Updating a plugin to a new version
Once your plugin is in the wild, preparing an update is relatively easy.
First, use the SVN Update command to make sure you have the latest version of the repository. If you're the only developer, you should already, but it's good practice to update before you commit anyway.
Then go through the process above to create a new sub-folder in /tags for your new version. Say, /tags/0.2. Don't touch the old /0.1 folder. It's there for a reason and you'll never touch it again.
Commit your new tag, then go to the /trunk folder. Replace everything in /trunk with your new version and commit as above. Once the servers update, they'll start talking about the new version rather than the old one.


